

Figma
Case study, 2025
Addressing limitations with Figma’s motion editing.
Timeline
72 hour design challenge
Skills
Product thinking
User experience design
Creative direction
Purpose
Strengthen product sense
User Research
To ensure the project would address real pain points, I conducted user interviews and user research from Figma users, designers, and illustrators. Here were their complaints:
- “The moment I tried to do advanced animation on Figma, I got disappointed.” (Reddit user)
- “I use Figma’s prototyping for simple movements, but it’s a whole process. I don’t want to have to make 10 frames just to prototype a cursor moving.” (Iris Leung, Tesla product designer)
- “If you know a decent animation or motion editing software already, I’d stick with that over Figma.” (Reddit user)
Simple Additions
The bulk of complaints from Figma users can be boiled down to 2 main pain points:
- Limitations with editing functionality
- Cluttered interface when prototyping motion graphics
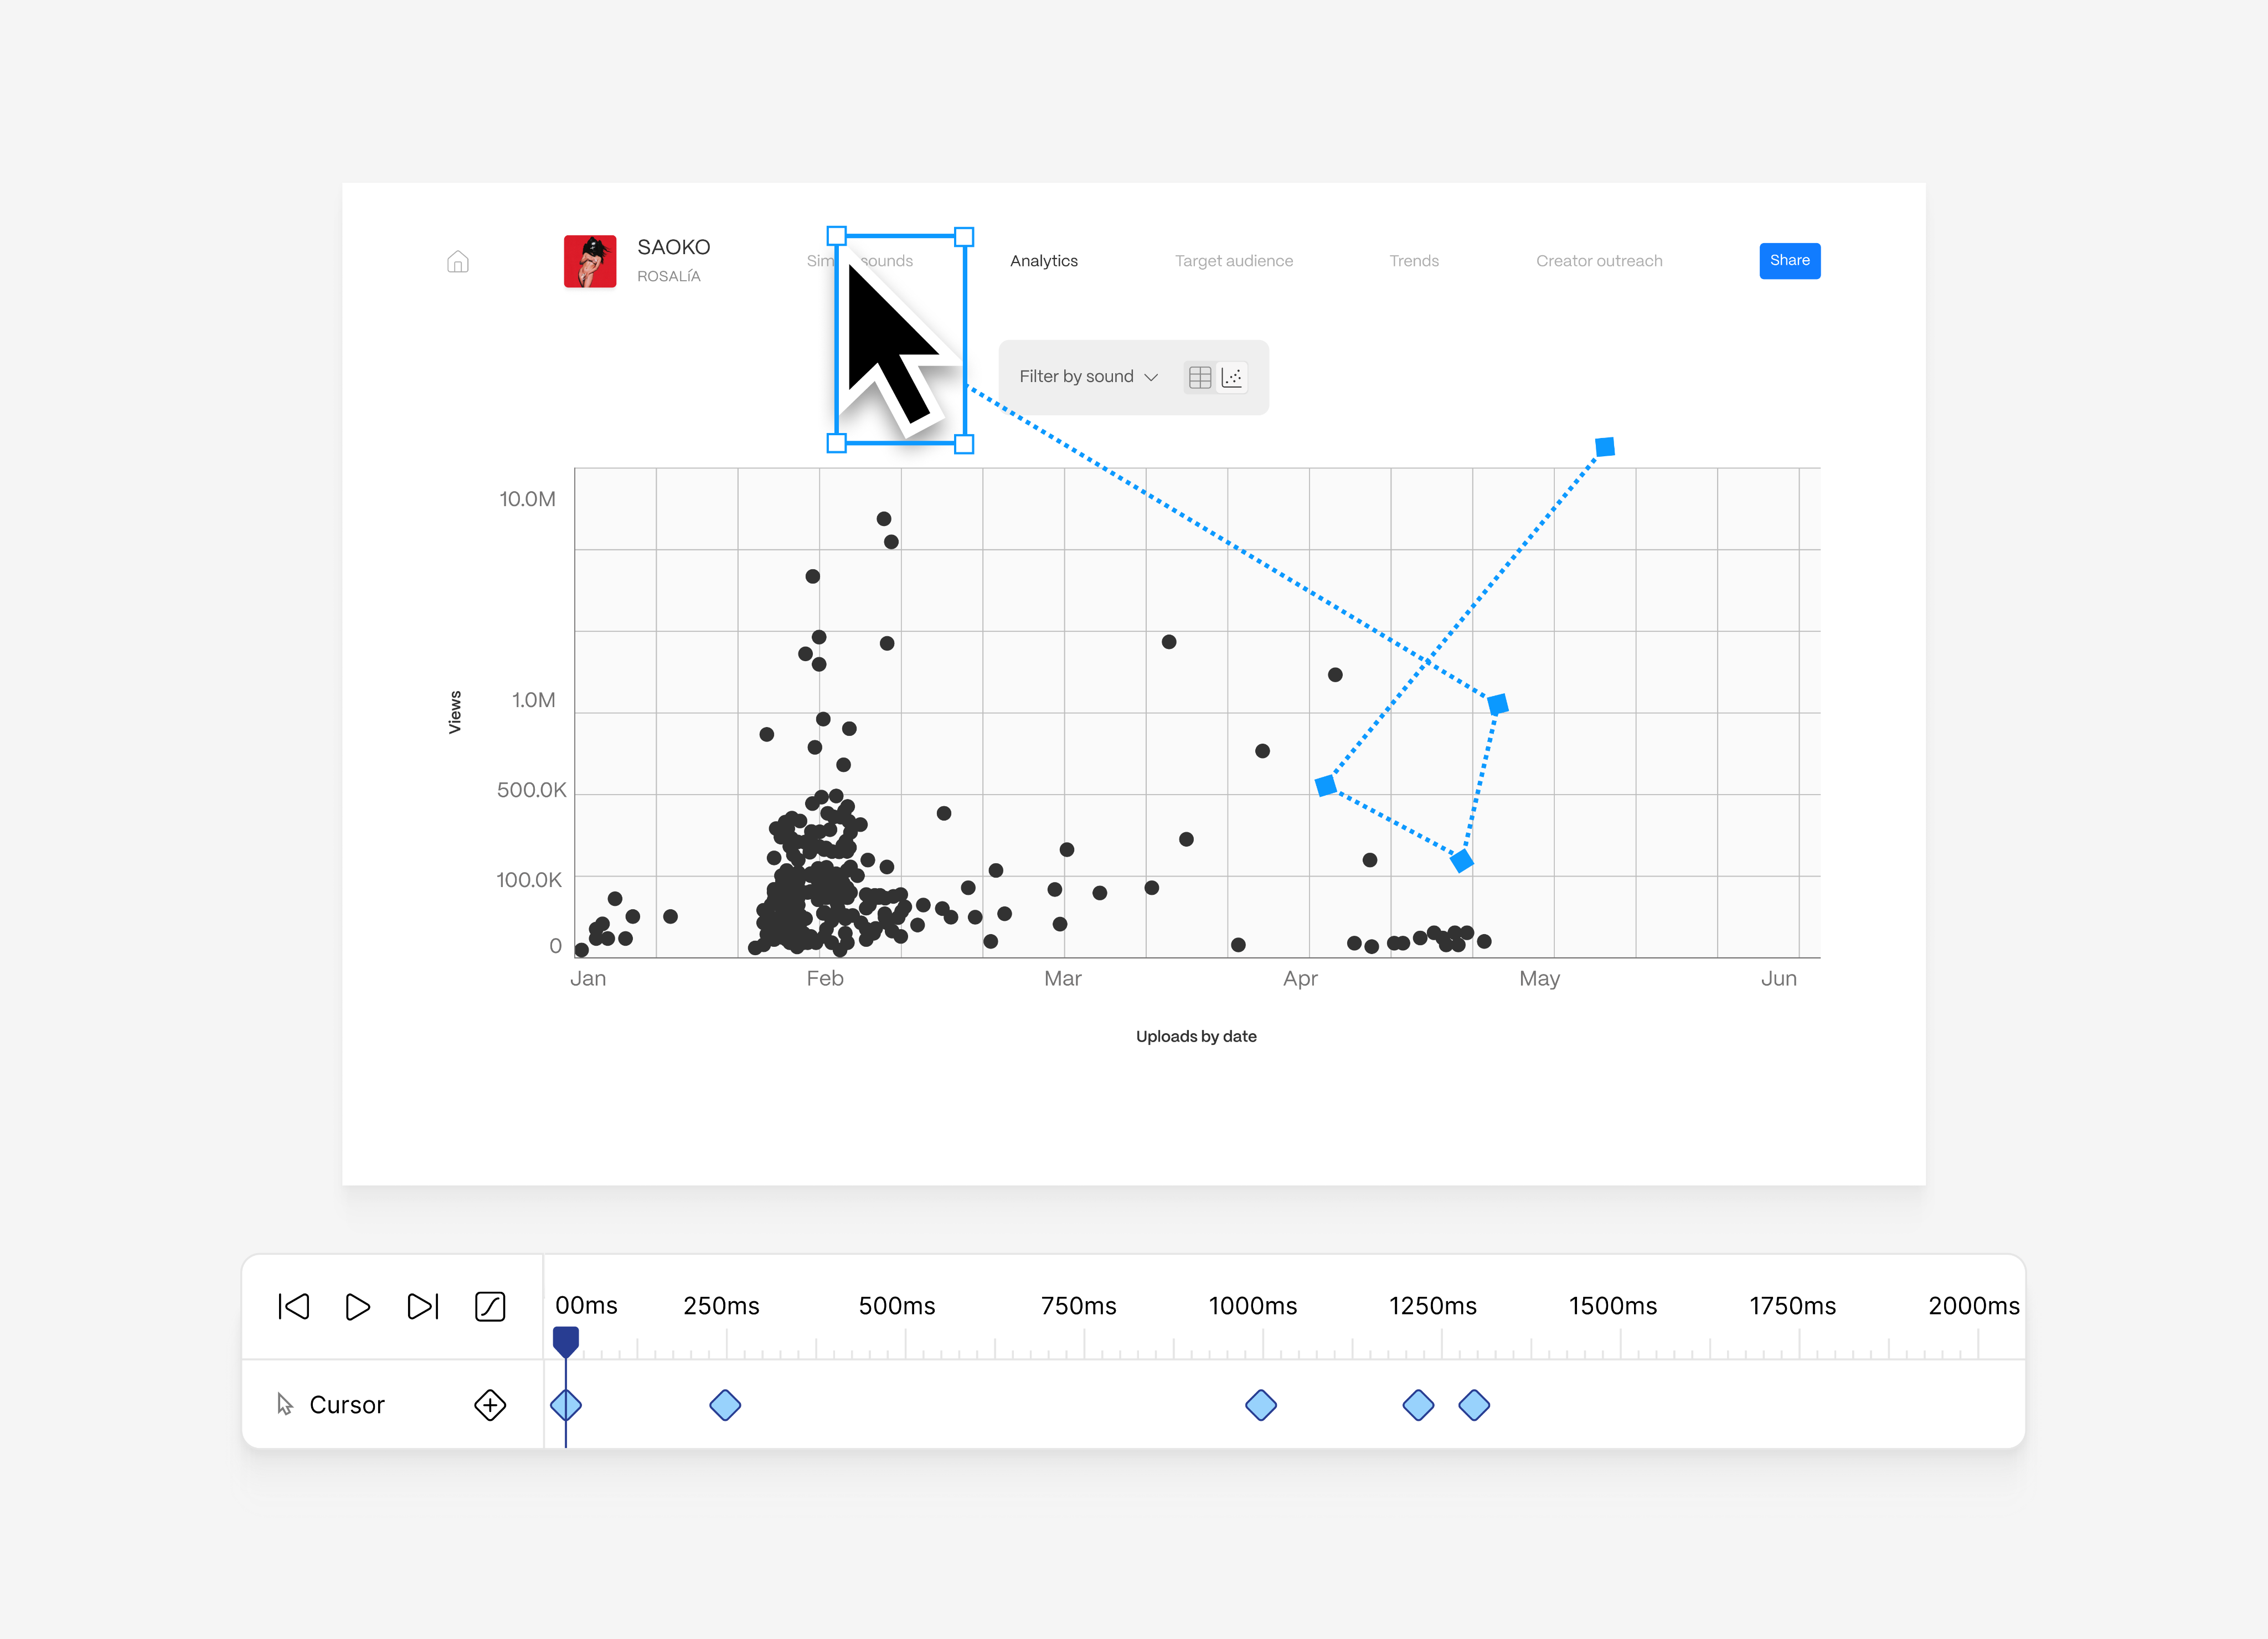
I decided to address these two complaints through adding 2 features: timeline and key framing.
Walkthrough
Multiple prototyping frames can simplify into a single frame, clearing up user space and simplifying workflow.
User flow:
- Enter prototype mode and click on a frame. Open the timeline using the hot key Option + Command + T.
- Select an item you want to edit in timeline. The timeline automatically adds once the user clicks an item.
- Add keyframes using either the hot key Shift + K, or manually from the timeline or side panel. Curves and ease can be added through the keyframes, eliminating unnecessary space and giving users more power in their motion editing.
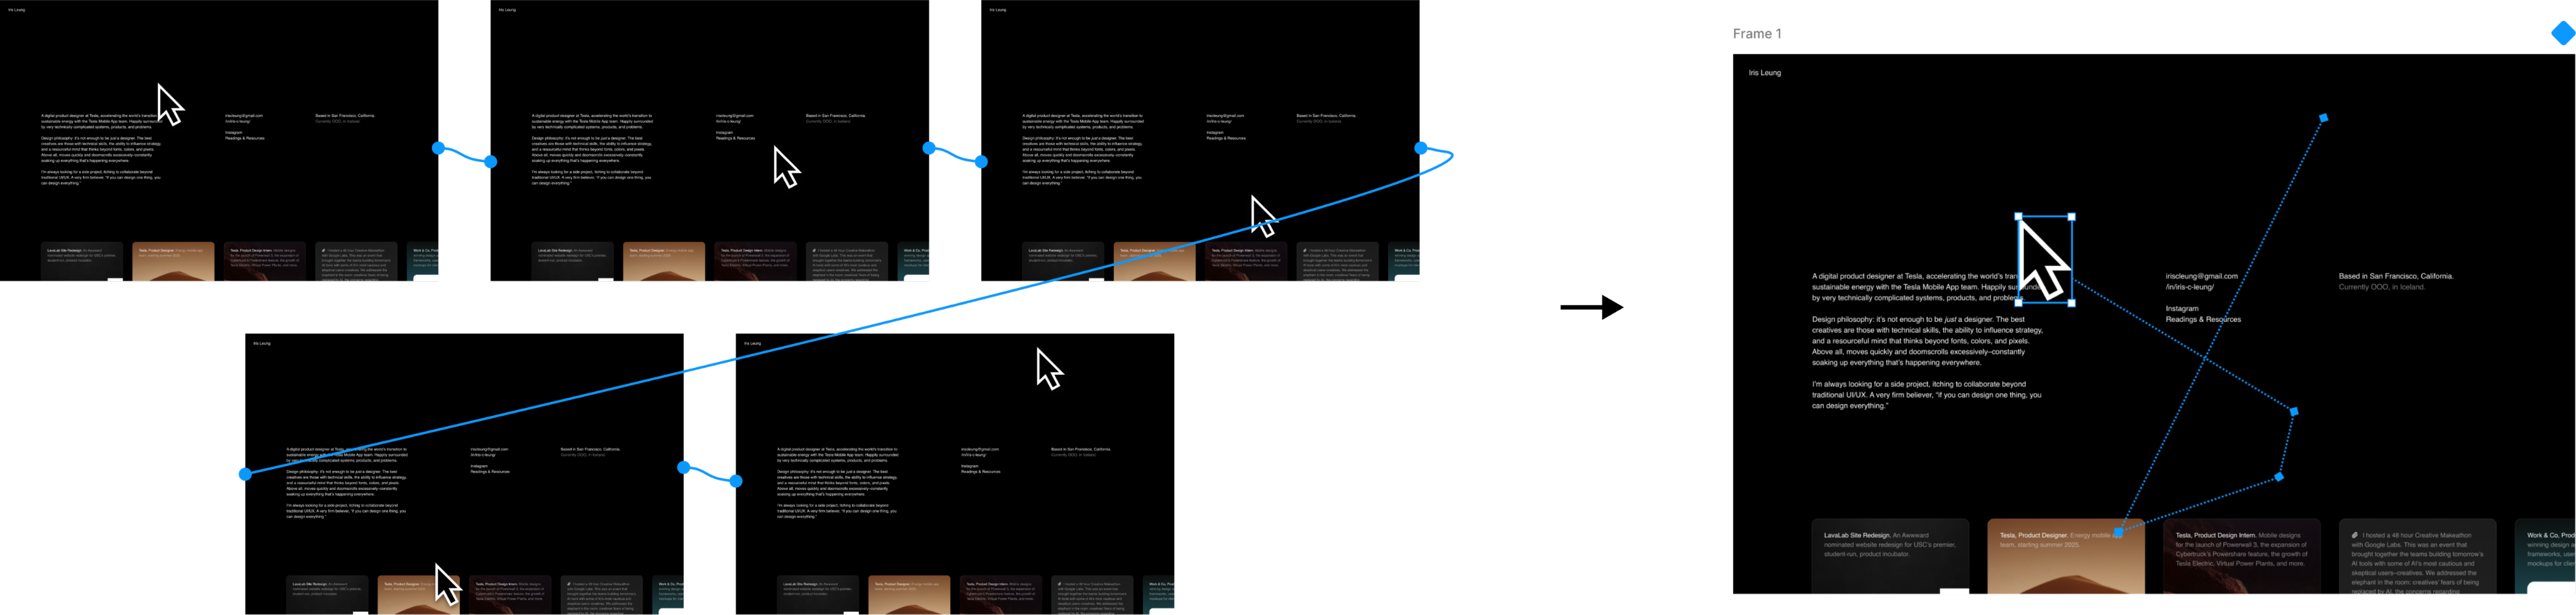
Reduced Space

Hot keys
I decided to split Figma’s motion editing into two seperate features:
Open timeline
Option + Command + T

Add keyframe
Shift + K

Takeaways and Potential Improvements
Giving myself a 72 hour timeframe pushed me to trust my decision making. Initial challenges included:
- Adding motion editing capabilities without losing sight that Figma is made for product designers
- How can we simplify powerful motion editing tools to be comprehensible for product designers?
- How can we implement new features without breaking workflow?
Overall, I believe the project found success in being able to give users powerful editing tools while being intuitive. However, for future iterations I would experiment with integrating the workflow more seamlessly as to not risk a complicated design flow for strong functionality.
Figma
Case study, 2025
Addressing limitations with Figma’s motion editing.
Timeline
72 hour design challenge
Skills
Product thinking
User experience design
Creative direction
Purpose
Strengthen product sense
User Research
To ensure the project would address real pain points, I conducted user interviews and user research from Figma users, designers, and illustrators. Here were their complaints:
- “The moment I tried to do advanced animation on Figma, I got disappointed.” (Reddit user)
- “I use Figma’s prototyping for simple movements, but it’s a whole process. I don’t want to have to make 10 frames just to prototype a cursor moving.” (Iris Leung, Tesla product designer)
- “If you know a decent animation or motion editing software already, I’d stick with that over Figma.” (Reddit user)
Simple Additions
The bulk of complaints from Figma users can be boiled down to 2 main pain points:
- Limitations with editing functionality
- Cluttered interface when prototyping motion graphics
I decided to address these two complaints through adding 2 features: timeline and key framing.
Walkthrough
Multiple prototyping frames can simplify into a single frame, clearing up user space and simplifying workflow.
User flow:
- Enter prototype mode and click on a frame. Open the timeline using the hot key Option + Command + T.
- Select an item you want to edit in timeline. The timeline automatically adds once the user clicks an item.
- Add keyframes using either the hot key Shift + K, or manually from the timeline or side panel. Curves and ease can be added through the keyframes, eliminating unnecessary space and giving users more power in their motion editing.
Reduced Space
Hot keys
Open timeline
Option + Command + T

Add keyframe
Shift + K

Takeaways and Potential Improvements
Giving myself a 72 hour timeframe pushed me to trust my decision making. Initial challenges included:
- Adding motion editing capabilities without losing sight that Figma is made for product designers
- How can we simplify powerful motion editing tools to be comprehensible for product designers?
- How can we implement new features without breaking workflow?
Overall, I believe the project found success in being able to give users powerful editing tools while being intuitive. However, for future iterations I would experiment with integrating the workflow more seamlessly as to not risk a complicated design flow for strong functinoality.
Figma
Case study, 2025
Addressing limitations with Figma’s motion editing.
Timeline
72 hour design challenge
Skills
Product thinking
User experience design
Creative direction
Purpose
Strengthen product sense
User Research
To ensure the project would address real pain points, I conducted user interviews and user research from Figma users, designers, and illustrators. Here were their complaints:
- “The moment I tried to do advanced animation on Figma, I got disappointed.” (Reddit user)
- “I use Figma’s prototyping for simple movements, but it’s a whole process. I don’t want to have to make 10 frames just to prototype a cursor moving.” (Iris Leung, Tesla product designer)
- “If you know a decent animation or motion editing software already, I’d stick with that over Figma.” (Reddit user)
Simple Additions
The bulk of complaints from Figma users can be boiled down to 2 main pain points:
- Limitations with editing functionality
- Cluttered interface when prototyping motion graphics
I decided to address these two complaints through adding 2 features: timeline and key framing.
Walkthrough
Multiple prototyping frames can simplify into a single frame, clearing up user space and simplifying workflow.
User flow:
- Enter prototype mode and click on a frame. Open the timeline using the hot key Option + Command + T.
- Select an item you want to edit in timeline. The timeline automatically adds once the user clicks an item.
- Add keyframes using either the hot key Shift + K, or manually from the timeline or side panel. Curves and ease can be added through the keyframes, eliminating unnecessary space and giving users more power in their motion editing.
Reduced Space
Hot keys
Potential hot keys:
Open timeline
Option + Command + T

Add keyframe
Shift + K

Takeaways and Potential Improvements
Giving myself a 72 hour timeframe pushed me to trust my decision making. Initial challenges included:
- Adding motion editing capabilities without losing sight that Figma is made for product designers
- How can we simplify powerful motion editing tools to be comprehensible for product designers?
- How can we implement new features without breaking workflow?
Overall, I believe the project found success in being able to give users powerful editing tools while being intuitive. However, for future iterations I would experiment with integrating the workflow more seamlessly as to not risk a complicated design flow for strong functionality.